“`html
If you’re on the hunt for a dessert that feels festive, creamy, and absolutely irresistible without spending hours in the kitchen, this No Bake Peppermint Pie Recipe is going to be your new favorite treat. Combining the cool, refreshing flavor of peppermint with a rich cream cheese filling and a crunchy Oreo crust, this pie is not only a breeze to whip up but also a guaranteed crowd-pleaser. It’s perfect for holiday gatherings or anytime you want a slice of deliciousness that requires no oven at all.
Ingredients You’ll Need
The magic behind this No Bake Peppermint Pie Recipe lies in its simple, thoughtfully chosen ingredients. Each one plays a crucial role in bringing together the perfect balance of flavors, textures, and festive color.
- Hershey’s Candy Cane Kisses, chopped: Adds bursts of minty sweetness and a crunchy texture that elevates every bite.
- Oreos, crushed: Creates a rich and chocolatey base that’s both sturdy and delicious.
- Unsalted butter, melted: Helps bind the crust ingredients together while adding a mellow richness.
- Heavy cream: Whipped to stiff peaks, it lightens the filling, making it fluffy and silky smooth.
- Full-fat cream cheese, softened: The creamy foundation of the filling, lending tang and body.
- Powdered sugar: Sweetens the filling delicately, blending perfectly without grittiness.
- Vanilla extract: Enhances the overall flavor with a warm, inviting note.
- Peppermint extract: Infuses the entire pie with that unmistakable holiday freshness.
- Red food coloring (optional): For those who want to add a festive swirl of color, making the pie as beautiful as it tastes.
How to Make No Bake Peppermint Pie Recipe
Step 1: Prepare the Crust
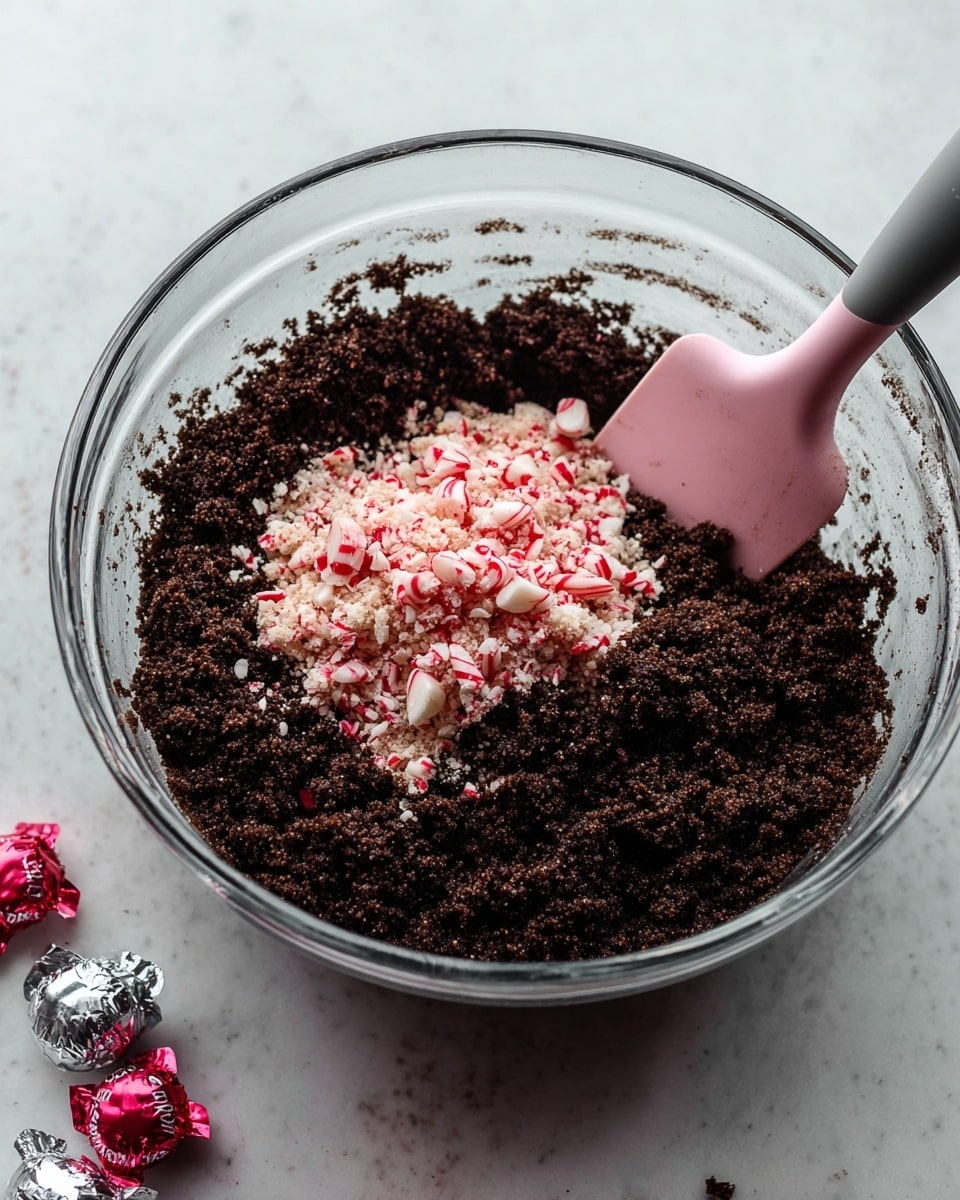
Start by crushing your Oreos into fine crumbs and mixing them with a quarter cup of the chopped Candy Cane Kisses. Drizzle the melted butter over the cocoa-mint mix and stir until everything comes together perfectly. Press this mixture into the bottom of your springform pan or pie plate, creating an even crust. Chill it in the refrigerator for about 30 minutes to set while you prepare the luscious filling.
Step 2: Whip the Cream
Next, whip your heavy cream until it forms stiff peaks. This might take 3 to 4 minutes, but don’t rush it. The creamy whipped texture will add lightness and airiness to your peppermint pie filling. Pop this whipped cream right back into the fridge to keep it chilled until it’s time to fold it in.
Step 3: Make the Cream Cheese Mixture
Now, beat the softened cream cheese until smooth and creamy. Lower the speed and slowly incorporate the powdered sugar, then bring the mixer back up to medium-high speed to achieve a silky consistency. Add vanilla and peppermint extracts, and if you’re opting for that festive touch, mix in the red food coloring here until swirled beautifully.
Step 4: Combine and Add Kisses
Turn off the mixer and gently fold in the cold whipped cream using a spatula until the filling looks smooth and any red swirls have blended nicely. Sprinkle in two-thirds of the chopped Candy Cane Kisses and fold them through, so each slice gets a delightful crunchy surprise.
Step 5: Assemble and Chill
Pour this velvety filling over the chilled Oreo crust, smoothing the top carefully. Finish by scattering the remaining chopped Kisses over the surface for sparkle and extra minty goodness. Cover the pie tightly and refrigerate for at least 4 hours, or even better, overnight, for the flavors to meld and the filling to set perfectly.
How to Serve No Bake Peppermint Pie Recipe

Garnishes
Presentation makes all the difference! Top your pie with whole Hershey’s Candy Cane Kisses or a few extra Oreo crumbs for a rustic look. Fresh mint leaves or a dollop of whipped cream can add an elegant touch, enhancing both appearance and flavor.
Side Dishes
This No Bake Peppermint Pie pairs wonderfully with simple accompaniments like hot cocoa or a cup of rich coffee—the perfect balance of warm and cool sensations to delight your palate. Even a light fruit salad with citrus or berries can complement the creamy, minty richness.
Creative Ways to Present
For a festive party, serve the pie in individual clear cups layered with crushed Oreos and extra peppermint bits for a fun twist. Or freeze mini pie pops with lollipop sticks inserted before chilling, turning this favorite into a handheld treat that’s as charming as it is delicious.
Make Ahead and Storage
Storing Leftovers
Once you’ve indulged in a slice (or two), cover any leftover No Bake Peppermint Pie tightly with plastic wrap or foil and keep it refrigerated. It will stay fresh and creamy for up to 5 days, so you can enjoy it well into the week without any worry.
Freezing
If you want to save some for later or prepare ahead of a big gathering, this pie freezes beautifully. Wrap it tightly in plastic wrap and then foil to prevent freezer burn. It can remain frozen for up to 2 months—just thaw it overnight in the fridge before serving.
Reheating
Because this No Bake Peppermint Pie Recipe is best served cold, simply thaw and serve as is—no reheating required. This keeps the texture perfect and the peppermint flavor fresh and vibrant every time.
FAQs
Can I use a different cookie for the crust?
While Oreos are traditional and give a great chocolate flavor, you can experiment with chocolate graham crackers or chocolate wafer cookies. Just make sure to adjust the amount of butter if the crumbs seem too dry or too oily.
What if I don’t have peppermint extract?
If you’re out of peppermint extract, you could substitute with peppermint oil, but use sparingly since it’s more potent. Alternatively, a few drops of spearmint extract can offer a milder minty flavor, though it won’t be quite as classic.
Is this pie suitable for kids?
Absolutely! This pie is child-friendly, but keep in mind the peppermint flavor can be quite strong, so you may want to adjust the amount of peppermint extract to suit younger taste buds.
Can I make this pie vegan or dairy-free?
This recipe relies heavily on cream cheese and heavy cream for its texture and flavor. However, you can try using dairy-free cream cheese and coconut cream whipped to stiff peaks as substitutes, but the texture and taste will vary somewhat.
How can I make the pie more festive for holidays?
In addition to the red food coloring swirl, adding crushed candy canes or edible glitter on top makes the pie sparkle for any holiday celebration. You could also serve slices with a drizzle of chocolate sauce or a dusting of powdered sugar for that extra festive touch.
Final Thoughts
This No Bake Peppermint Pie Recipe is truly a gem—simple to make, stunning to serve, and downright delicious to eat. Whether you’re aiming to impress guests or treat yourself, it guarantees a festive, minty delight without any oven heat. I can’t wait for you to make this at home and experience firsthand how effortlessly wonderful a homemade peppermint dessert can be!
“`
Print
No Bake Peppermint Pie Recipe
- Total Time: 4 hours 45 minutes
- Yield: 10 servings
- Diet: Vegetarian
Description
This No Bake Peppermint Pie is a festive and creamy dessert featuring a chocolate cookie crust combined with peppermint-flavored cream cheese filling. It’s topped with chopped Hershey’s Candy Cane Kisses for a delightful minty crunch, making it perfect for holiday celebrations or any time you crave a refreshing, easy-to-make treat.
Ingredients
Crust
- 18 Oreos, crushed
- ¼ cup (57g) unsalted butter, melted
- 1 bag Hershey’s Candy Cane Kisses, unwrapped, chopped, and divided
Filling
- 8 ounces (227g) full-fat block cream cheese, softened to room temperature
- 1 cup (120g) powdered sugar
- 1 teaspoon vanilla extract
- ½ teaspoon peppermint extract
- 1 cup (240mL) heavy cream
- Red food coloring, 2 drops (optional)
Instructions
- Prepare the crust: Place the crushed Oreos and ¼ cup of the chopped Hershey’s Candy Cane Kisses in a medium bowl. Toss together to combine. Drizzle the melted butter evenly over the mixture and stir until completely mixed. Press this mixture evenly into the bottom of a 9-inch springform pan or an 8 or 9-inch pie plate. Refrigerate for at least 30 minutes to set.
- Make whipped cream: In a medium bowl, use a hand mixer or stand mixer with a whisk attachment to beat the heavy cream until stiff peaks form, about 3-4 minutes. Chill the whipped cream in the refrigerator until ready to use.
- Prepare the filling base: In a large bowl, beat the softened cream cheese on medium-high speed until smooth using a hand mixer or stand mixer with a paddle attachment. Lower the speed and add powdered sugar, then increase speed and beat until smooth again. Add vanilla extract, peppermint extract, and red food coloring (if using), mixing until evenly combined. Scrape down the bowl as needed.
- Fold in whipped cream and candy: Turn off the mixer and gently fold the chilled whipped cream into the cream cheese mixture using a large spatula until the red color swirls disappear and the filling is uniform. Fold in ⅔ cup of the remaining chopped Hershey’s Candy Cane Kisses until evenly dispersed.
- Assemble and chill: Pour the filling onto the prepared crust and spread evenly with a spatula or offset spatula. Sprinkle the remaining chopped Hershey’s Candy Cane Kisses over the top. Cover the pie with foil or plastic wrap and refrigerate for at least 4 hours, ideally overnight, to allow the pie to fully set.
- Serve and store: Serve chilled. Store leftovers covered tightly in the refrigerator for up to 5 days, or wrap tightly and freeze for up to 2 months. Thaw frozen pie in the refrigerator overnight before serving.
Notes
- Use regular Oreo cookies with the regular cream filling for the best crust texture and taste.
- Red food coloring is optional; AmeriColor brand is preferred but any food coloring brand can be used or omitted entirely.
- For easier handling, chill the whipped cream thoroughly before folding it into the cream cheese mixture.
- You can substitute the springform pan with a standard pie plate if preferred.
- Prep Time: 45 minutes
- Cook Time: 0 minutes
- Category: Dessert
- Method: No-Cook
- Cuisine: American

